Realtracs provides you with multiple 3rd Party Tools right from our platform. Due to Realtracs' integration a single sign-on provides seamless access to Transaction Desk!

![]()
The Tennessee REALTORS® maintains a full library of up to date state forms & contracts through Transaction Desk. Transaction Desk is a document management program which is provided by Lone Wolf Technologies-Instanet Solutions, a Tennessee REALTORS® preferred provider and is FREE to all Members. It allows You to create, edit, and delete forms and auto populate forms via Realtracs data within Transactions; and allows participation with clients, customers and vendors.
Create a Transaction using the Realtracs MLS number:
You can access Transaction Desk from Realtracs 3 ways
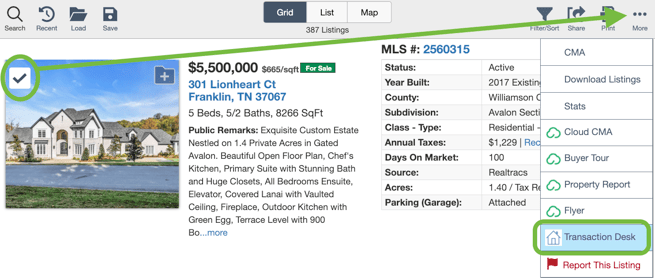
From the Quicklinks Widget on your dashboard OR From My Listings in the top Navigation bar OR From an actual Listing, select the listing, then, go to the more menu and select 'Transaction Desk'.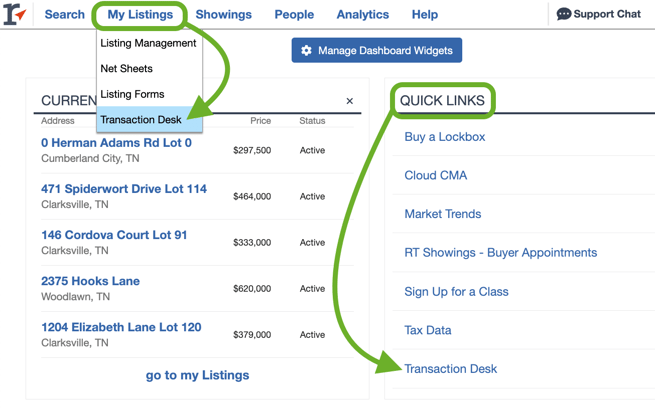
-
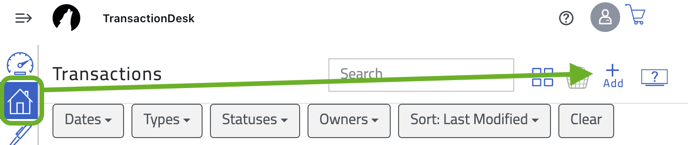
If arriving in Transaction Desk from Quick Links Widget or the My Listings Navigation menu, select the Transactions icon, then click the plus icon to add.
 Fill in the Name Field-usually the property address, then, using the drop downs, enter the Template, the Import Data-this should be: RealTracs (Web API) and if you are the Listing Agent or Selling Agent, neither or both, then select the blue Create button. If arriving in Transaction Desk from a listing, the Create Transaction box will automatically appear with the property address prefilled
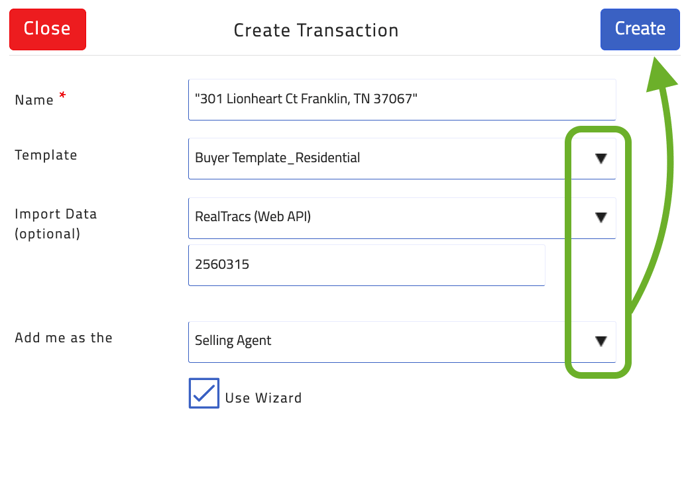
-
This will direct you to the Wizard. Much of the listing info is populated automatically from Realtracs.
 At the top of the page, you can do any of the following:
 -
Update the listing address
-
Use the status dropdown to set the transaction status
-
Click email
 to view the specific email address for the transaction that you can use to email documents directly to the transaction.
 -
Use the more options menu
 to do any of the following:
-
Delete the transaction.
-
Share the transaction with other agents within your office.
-
Add a note to the transaction.
-
Duplicate the transaction.
-
Create or apply a template to the transaction.
-
Import information from an MLS listing.
-
Archive the transaction.
-
Update the transaction status.
-
-
-
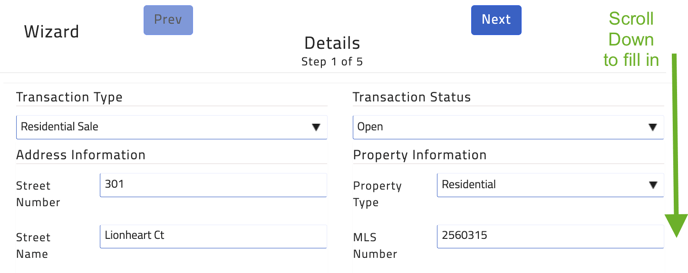
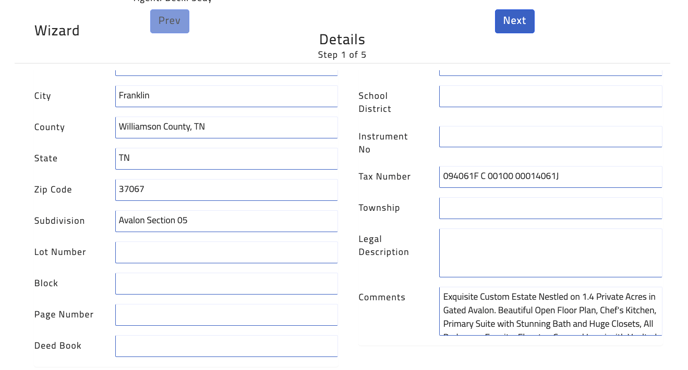
From this point on, the steps follow as if you are using the wizard to create the transaction. In the Details tab of the transaction, in the Property Information area, enter as much information as you can.
-
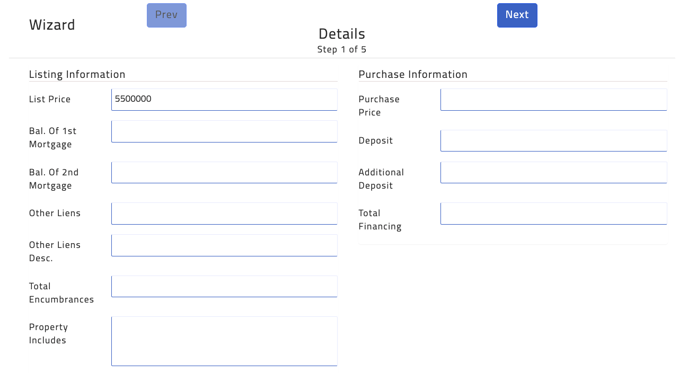
Scroll down to the Listing Information area, and enter any additional information you can.
-
If this transaction includes sale information, in the Purchase Information area, enter as much information as you can. Otherwise click Next.
-
In the Transaction Dates area, enter as much information as you can. If applicable, in the Mortgage Dates area, enter as much information as you can.

-
Click Next, or click the Contacts tab. The Contacts page appears. This page lists all of the contacts associated with the transaction.
Note: If you added yourself to the transaction, your name appears. Other contacts are populated from Realtracs.

-
To add a contact to the transaction, click Add, and do one of the following:
-
Select Create new transaction contact to create a new contact in the transaction. Add the contact information, ensuring you provide the required information. To add the contact to your list of contacts, ensure Add to address book is checked. Click Save.
-
Select Add existing contact to add a contact to the transaction from your existing list of contacts. Check one or more contacts from the list that appears, and click Add. Add any additional information required, and click Save.
-
Select Add yourself to add yourself to the transaction. Add any additional information required, and click Save.
-
Select Add contact from Google to add one or more contacts from your Gmail list of contacts to the transaction and to the existing list of contacts in TransactionDesk. Check the contact to add, and click Select. Add any additional information required, and click Save.
-
-
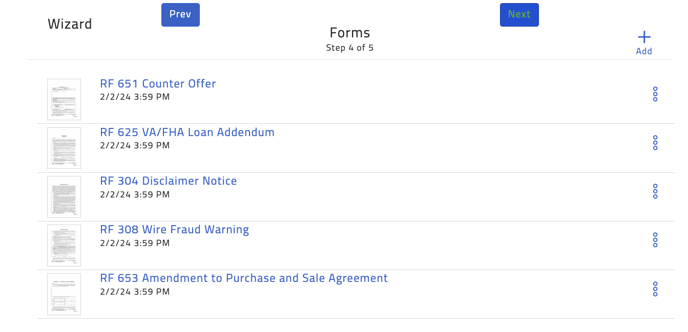
Click Next, or click the Forms tab. Any forms associated with the transaction through the template are listed here. To add more forms to the transaction, click Add. The Add forms to transaction page appears. Navigate through the folder structure and locate the form you want to add, or search for the form by name in the Search box. When you locate a form you want to include, use the selection box to the right of the form name to select the form for inclusion in the transaction, and click Add. You can see how many forms are selected in the shopping basket in the top right corner of the page.
-
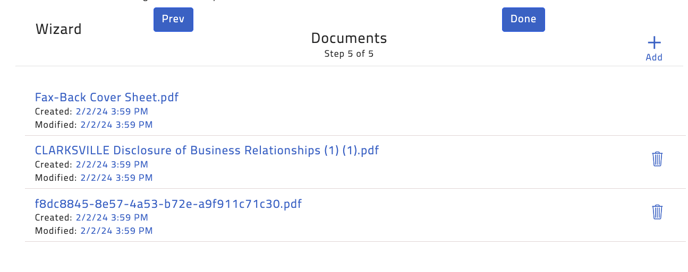
Click Next, or click the Documents tab. This is the list of documents associated with the transaction. Any documents that you want to keep as part of the transaction file can be uploaded here, such as property disclosures, maps, or any other documents.
-
To attach a document to the transaction, click Add. The Create New page appears. Do one or more of the following:
-
To upload a document from your computer, click
 (selected by default when you first see the page). Then drag and drop files from your computer to the Drag & Drop files here area, or click the blue bar to browse for the document(s) you want to upload.
 -
To copy documents from Documents, click
 . Navigate to and select the appropriate document, and click Save.
 -
To import a document from Dropbox, Google Drive, or another third-party document storage system, click
 . Select the appropriate third-party document storage system, locate the document, and click Add.
 -
To upload a document from your email account, click
 . The Email Upload Information page appears. Click Open in Email Client. Locate the document, and click Add.
 -
To download a contact card for the transaction, so that you can email documents directly to the transaction, click
 . This adds an email contact to your email. In future, you can email documents directly to this contact, and the documents are attached automatically to the transaction.
-
-
Click Done. The transaction is added to the list of transactions in the system.
📢 Still Need Assistance? Contact our Support Team!
💬 Chat with us! Click the chat bubble at the top right.
🕗 Mon - Fri: 7am - 6pm CST Sat: 9am - 4pm CST
✉️ support@realtracs.com 📞 p: 615-385-0777