These steps will assist with creating a RealTracs account within Apple Mail. If an existing RealTracs account is already setup within Mail, that account MUST be removed prior to inputting the new settings for the new account. If there is not an existing RealTracs account setup within Mail, please proceed to the "Setting up your mailbox" section of this document. NOTE: If your old RealTracs account was setup as a POP3 account, do not delete the account from Mail. Doing so may result in loss of old emails on your account. In this case, we recommend contacting our support team for assistance setting up the account.
Deleting an existing account: 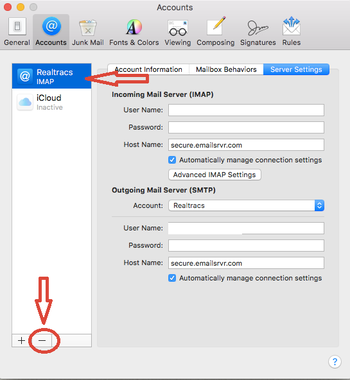
1. While within Mail, click on the Mail menu at the top-right corner of the page and choose Preferences
2. Click on the RealTracs account you wish to remove from the left side of the screen and select the "-" button located at the bottom of the list
3. You should no longer see the RealTracs account within the list of accounts. Now that the account has been deleted, you can click the "+" button located at the bottom of the accounts list to add the new account. This will start you off at step 5 of the account setup instructions found below.
Setting up your mailbox:
1. Launch Mail. If Mail is not located within your dock, you can access it by using Command + Space and typing Mail
in the Spotlight search.
2. Within Mail, click Mail on the top-left corner of the screen.
3. Select Add Account.
4. In the popup window, select Other Mail Account.
5. Then enter the following information:
- Name: Your Name
- Email Address: Your RealTracs Email
- Password: Your RealTracs Password
6. Select Sign In.
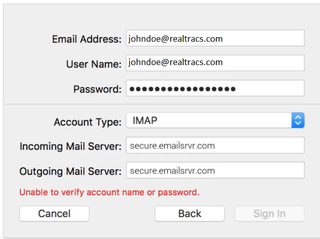
7. You will see an alert that states "Unable to verify account name and password," then you'll be prompt to add the additional information:
- Email Address: Your RealTracs Email
- User Name: Your RealTracs Email
- Password: Your RealTracs Password
- Incoming Mail Server: secure.emailsrvr.com
- Outgoing Mail Server: secure.emailsrvr.com
Note: Apple Mail will sometimes clear the User Name field after entering the Incoming and Outgoing Server fields. Ensure that the User Name is filled out upon entering these settings.
8. Click Sign In.
9. Click Done.
Next, you need to setup Folder Mapping. Here are the steps to do so:
1. Click Mail in the upper-right hand corner of Apple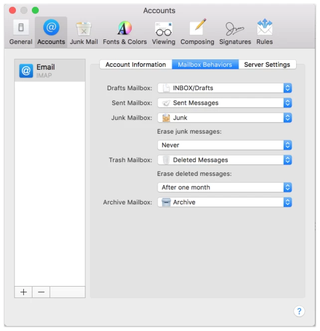
Mail. Select Preferences.
2. Click the Accounts tab then select your created RealTracs IMAP created account from the left pane.
3. Select the Mailbox Behaviors tab.
4. Click the Sent Mailbox drop down and select the folder sent from what’s listed under your RealTracs email address (not the one listed under “On My Mac”).
5. Click the Junk Mailbox drop down and select the folder spam that’s listed under your email address (not the one listed under “On My Mac”).
6. Click the Trash Mailbox dropdown and select the folder trash that’s listed under your email address (not the one listed under “On My Mac”).
Last, we need to verify the SMTP settings since Apple Mail tends to change them during account setup.
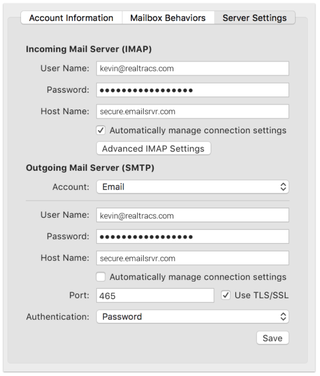
1. From the same Accounts tab when Folder Mapping above, click on Server Settings
2. Under Outgoing Mail Server SMTP, uncheck the automatically manage connection settings (make sure you do this under SMTP and not IMAP).
3. Change the Port Number to 465.
4. Keep option to Use TLS/SSL checked.
5. Click Save.
6. Close the Accounts Window.
7. Allow mail 15 minutes to
download.
📢 Still Need Assistance? Contact our Support Team!
💬 Chat with us! Click the chat bubble at the top right.
🕗 Mon - Fri: 7am - 6pm CST Sat: 9am - 4pm CST
✉️ support@realtracs.com 📞 p: 615-385-0777
