Outlook 2003, 2007, and 2010 are no longer supported by Outlook. As a result, RealTracs only supports Outlook 2013, 2016, and 2019.
These steps will assist with creating a RealTracs account within Outlook 2013 or 2016. If an existing RealTracs account is already set up within Outlook, that account MUST be removed prior to inputting the new settings for the new account. If there is NOT an existing RealTracs account setup within Outlook, please proceed to the "Setting up your mailbox" section of this document.
Deleting an existing account:
NOTE: If your old RealTracs account was set up as a POP3 account, do not delete the account from Outlook. Doing so may result in the loss of old emails on your account. In this case, we recommend contacting our support team for assistance in setting up the account.
If you have other accounts besides your RealTracs setup within Outlook follow these settings:
-
While within Outlook, click on File at the top-left corner of the window, choose Account Settings, and select Account Settings.
-
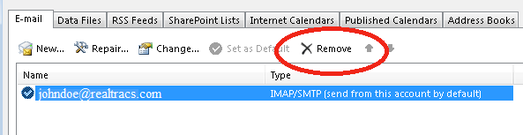
From the list of email accounts that display, select the RealTracs account and click the Remove option (shown below).
-
Outlook will prompt you if you would like to continue with the account removal, click Yes.
You should no longer see the RealTracs account within the list of accounts. Now that the account is removed, you may begin setting up the new account settings. Clicking New will start you off at step 4 within the instructions found within the "Setting up your mailbox" section below.
If RealTracs is the only account set up within Outlook follow these settings: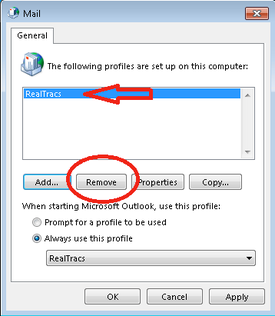
-
Click on the Start Menu and search for the Control Panel.
-
Once in the Control Panel, click on Mail.
-
From the Mail settings window, click the Show Profiles button.
-
Click on the RealTracs account from the list and select Remove.
-
You will be prompt if you want to confirm the removal of the account. Click Yes.
You should no longer see the RealTracs account within the list of accounts. Now that the account is removed, you may begin setting up the new account. You may start at step 3 within the "Setting up your mailbox" instructions found below.
Setting up your mailbox: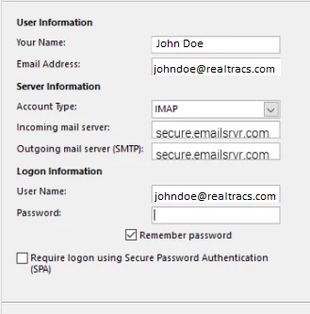
-
Click on the Start Menu and search for the Control Panel.
-
Once in the Control Panel, Click on Mail.
-
When the Mail Control Panel opens, select Show Profiles.
-
Select Add to add a new profile. Enter the name you wish and select OK.
-
Select Manual Setup or additional server types and click Next.
-
Choose POP or IMAP and click Next.
-
In the Add New Account window, input the following information:
-
Your Name: Your Name
-
Email Address: Your RealTracs Email
-
Account Type: IMAP

-
Incoming Mail Server: secure.emailsrvr.com
-
Outgoing Mail Server: secure.emailsrvr.com
-
User Name: Your RealTracs Email
-
Password: Your RealTracs Password
-
-
Click on the More Settings button and select the Outgoing Server tab
-
Check the box for My Outgoing Server (SMTP) requires authentication
-
Check the box for Use same settings as my incoming server.
-
Click the Advanced tab.

-
Change both servers to Use the following type of encrypted connection to SSL and change the port numbers as shown within the image with the red outlines to the right.
-
Click OK.
-
Click Next.
-
Outlook will now attempt to send a test message using the settings inputted. If everything was entered correctly, the message will send out successfully. You will receive a confirmation message and you may close out the window
-
Click Finish.
📢 Still Need Assistance? Contact our Support Team!
💬 Chat with us! Click the chat bubble at the top right.
🕗 Mon - Fri: 7am - 6pm CST Sat: 9am - 4pm CST
✉️ support@realtracs.com 📞 p: 615-385-0777
