Click the provider below that you would like to transfer Realtracs email messages to.
| Gmail - Desktop Browser | Apple Mail - MacOS |
| Outlook - Windows | Apple Mail App - iOS or iPadOS |
| Gmail App - iOS or Android | Outlook App - iOS or Android |

- Sign into Gmail using a web browser on your PC, Mac, or iPad.
- Click the gear icon in the upper right corner of Gmail, and select See all settings.

- Click on Accounts and Import. Then click on Import mail and contacts.

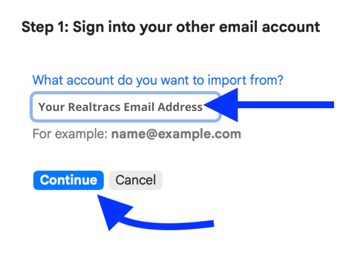
- Enter your Realtracs email address. Click Continue
- Enter your Realtracs password.
- Enter your Realtracs email address into the POP username field.
- Type secure.emailsrvr.com into the POP Server field.
- Click Edit, and change the Port number to 995. Click the checkmark box to Use SSL. Click Continue.

- Click Start Import, and click OK.

After email Import, separate your Realtracs emails into their own folder. Gmail calls folders "labels."
-
To create a folder, click the Labels plus icon, enter a label name, and click Create.

- The Gmail Inbox is where your Realtracs emails were imported to. Click Inbox to view your imported Realtracs emails.
- You can select multiple Realtracs emails at once by clicking the checkmark box to the left of each email. Or to select up to 50 email messages at once, click the checkmark box at the top left of Gmail.
- Once email messages have been selected, you can drag and drop them to the label you've created. Or you can click on the Move to icon and choose the label you've created.

- To finish migration, you'll need to switch your account to forward any further emails sent to your Realtracs email address to Gmail. Realtracs support will help make this Settings change with you. To complete this change, please call (615) 385-0777 and press 1 to speak to a team member.

- Open the Microsoft Outlook application and sign into an email account of your choosing other than Realtracs. The alternate (non-realtracs.com) email account you've chosen to sign into will serve as the account that Realtracs emails are transferred to.

- Click File and select Account Info.

- Select Accounts and click Add Account. Enter your Realtracs email address and click Continue.

- Enter your Realtracs password. Toggle on Show more and verify that Use recommended settings is also toggled on.

- Verify secure.emailsrvr.com displays for IMAP Incoming server. Verify Port 993 is selected and that SSL / TLS is displaying for Secure connection type. Scroll down.

- Verify that your Realtracs email address displays in the SMTP username field. Then enter your Realtracs password into the SMTP password field and scroll down.

- Verify secure.emailsrvr.com displays for SMTP Outgoing server. Verify Port 465 is selected and that SSL / TLS is displaying for Secure connection type. Click Continue.

- Click Continue again. Click Done and exit the Outlook Settings menu.
After email Import, transfer your Realtracs email messages into a backup folder within the alternate email account that you're already signed into within Outlook. - To create a Realtracs backup folder within your alternate email account, hover your mouse over the alternate email address and click the three dots. Then select Create new folder and name your backup folder "Realtracs Email Backup."


- Next, if applicable, hover your mouse over the Realtracs Email Backup folder, click the three dots, and select Create new subfolder as many times as needed in order to match the folder structure of your Realtracs Email Account. When creating new subfolders, name each subfolder identically to that of the folder in your Realtracs Email account.

Once you've got your folder structure the way you'd like, it's time to transfer your email messages to the alternate email account. - For each folder you're wanting to transfer messages for, first click the folder. Then hover over an email message within the folder and click the checkmark box to select the specified email message.

- Next, click the box at the top of the folder's list of email messages to select all email messages within the folder.

- Click anywhere within the blue selected messages. Hold down your mouse key after clicking. While holding, drag the email messages from the selected folder in your Realtracs email account to the corresponding folder (with the same name) in your Realtracs Email Backup to transfer the selected messages to your alternate email account.

- Outlook will notify you that you're transferring email messages to another account. Once notified, click Yes.

- Drag email messages from each folder located in your Realtracs email account and drop the email messages into the corresponding matching folder within the Realtracs Email Backup.
Note for the Inbox folder - You will need to drag to transfer email messages twice. You'll perform a select all and drag to transfer once for the "Focused" list of email messages. And you'll perform a second select all and transfer for the "Other" list of email messages also.

- To finish migration, you'll need to switch your account to forward any further emails sent to your Realtracs email address to Outlook. Realtracs support will help make this Settings change with you. To complete this change, please call (615) 385-0777 and press 1 to speak to a team member.

- **Attempts to transfer email messages to your Gmail account using the Android or iOS Gmail App could result in email message data loss. Please do NOT use the mobile Gmail App for email message transfers.**
- Instead, verify that you are signed into the same Gmail account on both your phone and on your desktop device. Then complete the Gmail - Desktop Browser guide using a web browser on your PC, Mac, or iPad.
- Once you've completed the Gmail - Desktop Browser guide, your Android or iPhone's Gmail App will automatically pull over any email messages into the Gmail App that were added to your Gmail account using the desktop web browser.

- Open the Apple Mail application on your Mac. Click Mail in the upper left corner and select Settings.

- Click the plus button in the lower left of the Accounts menu. Type in your Realtracs email address into the space provided and click Continue.

- Scroll down to choose your provider. Click Other Mail Account.

- Enter your Realtracs email address and password. Then click Sign In.

- Enter your Realtracs email address into the User Name field. Enter secure.emailsrvr.com into the Incoming Mail Server field and into the Outgoing Mail Server field. Click Sign In.

- Click Done and exit the Accounts menu.
- To create a Realtracs backup folder within Apple Mail, at the top of your Mac, click Mailbox and select New Mailbox. (Apple calls folders Mailboxes.)

- Choose a location, and name your new mailbox (folder) Realtracs Email Backup. Click Ok.
Note For Location - Only select iCloud if you have enough iCloud storage left to house your Realtracs email messages and if you need your Realtracs Email Backup Folder to automatically sync over to the Mail App on your iPad or iPhone. By default iCloud only comes with 5 Gigabytes of storage. For an option that doesn't require you to purchase more iCloud storage, it is recommended to choose On My Mac (your Mac's hard drive) for location.
- Next, if applicable, hold down the Control key on your keyboard while clicking on Realtracs Email Backup. Select New Mailbox and give the mailbox folder a name that matches one of the folders in your Realtracs email account. Then click OK.


Repeat this process as many times as needed in order to match the folder structure of your Realtracs email account.
Once you've got your folder structure the way you'd like, it's time to transfer your email messages to your Mac's hard drive. - For each folder you're wanting to transfer messages for, first click the folder. Then press the Command key and the A key on your keyboard at the same time. Pressing Command and A at the same time will select all messages in the specified folder.
Next, click anywhere within the blue selected messages. Hold down your mouse key after clicking. While holding, drag the email messages from the selected folder in your Realtracs email account to the corresponding folder (with the same name) in your Realtracs Email Backup to transfer the selected messages
- Drag email messages from each folder located in your Realtracs email account and drop the email messages into the corresponding matching folder within the Realtracs Email Backup.
Note For The Inbox Folder - Apple sorts messages in the Inbox folder into multiple categories that are located at the top of the folder. Before transferring messages from your Realtracs email account Inbox to your Realtracs Email Backup Inbox, click the All Mail category located at the top of your Realtracs email account's Inbox. Then press the Command key and the A key on your keyboard at the same time to select all messages within the All Mail category.
Next, click one of the selected messages in blue, hold down the mouse key after clicking, and drag the selected messages to their destination folder.
- To finish migration, you'll need to switch your account to forward any further emails sent to your Realtracs email address to Apple Mail. Realtracs support will help make this Settings change with you. To complete this change, please call (615) 385-0777 and press 1 to speak to a team member.

- **Attempts to transfer email messages to your iPhone or iPad using the Apple Mail App for iOS or iPad OS could result in email message data loss. Please do NOT use the mobile Apple Mail App for email message transfers.**
- Instead, verify that you are signed into the same iCloud account on your iPhone, Pad, and Mac. Then complete the Apple Mail - MacOS guide using your Mac computer.
- Once you've completed the Apple Mail - MacOS guide, your iPhone's and iPad's Mail App will automatically pull over any email messages into the iOS or iPad OS Mail App that were added to your Mac's Mail App.
While following the Apple Mail - MacOS guide, please be sure to select iCloud for your Realtracs Email Backup storage location. Selecting iCloud as the storage location will ensure that the Realtracs Email Backup folder displays successfully within your iPad's or iPhone's Mail App.

- **Attempts to transfer email messages to your alternate account using the Android or iOS Outlook App could result in email message data loss. Please do NOT use the mobile Outlook App for email message transfers.**
- Instead, verify you are signed into the same alternate email account within both your phone's Outlook App and in Microsoft Outlook for Windows. Then complete the Outlook - Windows guide on your PC.
- Once you've completed the Outlook - Windows guide, your Android or iPhone's Outlook App will automatically pull over any email messages into the mobile Outlook App that were added to your alternate account via Microsoft Outlook for Windows.
📢 Need Assistance? Contact our Support Team!
💬 Chat with us! Click the chat bubble at the top right.
🕗 Mon - Fri: 7am - 6pm CST Sat: 9am - 4pm CST
✉️ support@realtracs.com 📞 p: 615-385-0777